


3.
Programming Tutorial for Java
This tutorial takes you very quickly through the CodeWarrior Java environment. It does not teach you Java programming. It is designed to teach you how to use the CodeWarrior Integrated Development Environment (IDE) to write and debug Java code. The tutorial takes you step-by-step through the entire process. The applet you create is designed to be immediately reusable with little to no change, depending on your needs.
 NOTE:
NOTE:
This tutorial requires a Java-enabled browser or Java applet viewer. If you do not already have a Java enabled browser installed, the latest version of Microsoft Internet Explorer is available on the CodeWarrior CD.
The topics discussed in this tutorial are:
Applet Description

The applet you will create in this tutorial is an animation with sound, that you can add to any web page. This particular implementation shows a nifty about box animation with sound. But when we are done with this tutorial, you will be able to use this applet for anything you want simply by changing the parameters in the applet HTML tag.
Theory of Operation
How the applet works is fairly simple. It loads the AboutBox.gif image into memory. The image contains 49 sections, from top to bottom, each containing a different slide of the animation. The applet uses an array (sequence[]) to describe the sequence in which the slides are displayed. The image display sequence is played and repeated indefinitely.
Each time the applet gets an update event, it calls a Paint method that draws the appropriate slide based on the slide number contained in the current element of the sequence array.
When the applet gets to the slide indicated by the soundSlide variable, it plays the sound file specified in the sound parameter of the applet HTML tag. In this tutorial, the metal_stamp.au sound file is played.
The last four elements of the sequence array cause the last two slides to be repeated. This coincides with the playing of the sound file. It creates the illusion that the Metrowerks name bar is "stamped" into place.
Figure 3.1 shows how the applet works. The first element of the sequence array holds the number one. The applet displays the section of the image corresponding to slide one. The second element of the array holds the number two. The applet displays slide two. The third element of the array contains the number three. The applet displays slide three. This continues until the end of the array is reached, and the sequence is repeated.
Figure 3.1 Theory of Operation

Before You Begin

Before you begin, locate the AboutBox Tutorial folder. It is in one of the locations outlined below. If the ImageMap Tutorial folder is not already installed on your hard drive, copy it from the CodeWarrior Reference CD to your hard drive now. The files you create and modify during this tutorial are located in this folder.
AboutBox Tutorial folder locations
Windows
CodeWarrior Examples\CodeWarrior Java\Java Tutorial\AboutBox Tutorial\
Mac OS
CodeWarrior Examples:CodeWarrior Java:Java Tutorial:AboutBox Tutorial:
Solaris
CodeWarrior_Examples/Java_Tutorial/AboutBox_Tutorial/
All of the files for the completed tutorial are located in the AboutBox Solution folder inside of the Java Tutorial folder. You can compare your work against these files if you run into problems.
 WARNING!
Be careful to use the exact names specified in each step of this tutorial. Some features of Java are very dependent on names, and the applet may not work if names do not match exactly. Java is a case-sensitive language; so make sure you match case as well as spelling.
Creating the Project

In this section we will show you how to create a project using the CodeWarrior IDE, and how to set the project up to make a Java applet. The steps required to do this are as follows:
Creating a New Project

We will use the CodeWarrior IDE to create a new project to use for our tutorial.
1. Locate the CodeWarrior IDE application and launch it.
The IDE launches and awaits your command.
2. Choose File > New.
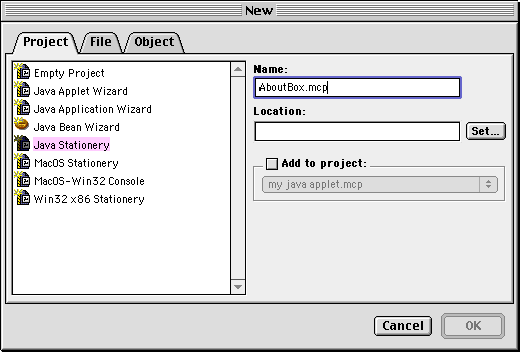
The New dialog box appears (Figure 3.2).
Figure 3.2 The New dialog box
3. Select the stationery.
Click the Java Stationery in the list so that it is highlighted.
4. Name the project.
Name the project AboutBox.mcp.
 NOTE:
NOTE:
The ".mcp" suffix is a CodeWarrior naming convention for project files. If you use this naming convention, you will be able to use your project files on any host that CodeWarrior runs on.
5. Click Set.
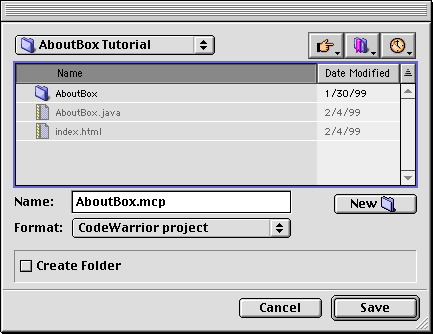
CodeWarrior displays a save file dialog.
6. Uncheck the Create Folder option.
This option is located at the bottom of the dialog box. Since we are providing you with a tutorial folder to work with, there is no need to create a enclosing folder for this project.
Figure 3.3 The Save Project As box
7. Choose the location of the new project.
Navigate to the AboutBox Tutorial folder on your hard drive. The dialog box should look like Figure 3.3. Click the Save button to return to the New dialog box.
8. Click the OK button.
CodeWarrior displays the New Project Stationery window, listing all of the available Java stationery types.
9. Choose Java Applet from the list of stationery types.
Click Java Applet in the list to select it. Then click OK. CodeWarrior creates your new project.
When saving the new project, CodeWarrior creates three files in the tutorial folder:
 WARNING!
The project data folder contains files with information about your project file, target settings, object code, and browser information. Do not change the contents of this folder.
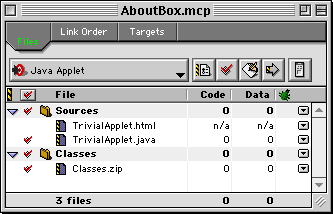
Code Warrior opens the project and displays a window similar to that shown in Figure 3.4. We are now ready to proceed to the next section.
Figure 3.4 The project window
Changing Target Settings

In this section, we will change the settings in the project to instruct CodeWarrior to build a Java class folder for the applet.
About Build Targets
A project file can have multiple build targets. For example, it is common to have a debug build target and a release build target in the same project. Each build target has its own unique collection of settings that control how CodeWarrior creates the final executable. These settings are called the build target settings. These settings can be accessed by choosing Edit > Target Settings (where Target is the name of the current build target displayed in the project window). Choosing this menu item open the Target Settings window. When the settings for a build target are changed, the change affects only the current build target.
 NOTE:
NOTE:
CodeWarrior also has "global" preferences that affect all projects. For more information on preferences and build target settings, see the IDE User Guide.
When you create a new project using stationery, the default build target settings are already set. However, for most projects, you will need to change a few of these settings in order to get the results you want.
The steps required to make appropriate changes to the project for this tutorial are:
1. Open the Target Settings window
Choose Edit > Java Applet Settings. CodeWarrior displays the Target Settings dialog box (Figure 3.5). Note that Java Applet is the name of the build target in the new project. This menu item always reflects the name of the build target currently being displayed in the project window.
Figure 3.5 Target settings dialog box
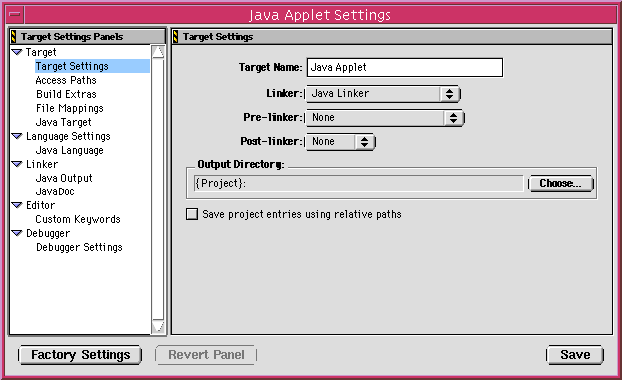
The Target Settings window contains a list of settings panels on the left. The right side of the dialog box shows the options for the currently selected panel.
For a more detailed description of each settings panel, see "Target Settings for Java."
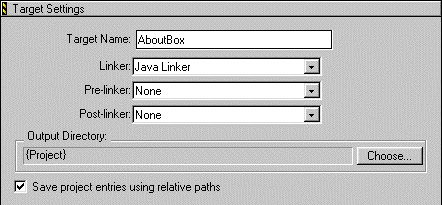
2. Change the target name
Select Target Settings under the Target section of the list of settings panels on the left. Change the Target Name field to "AboutBox" (Figure 3.6). Notice how changing the name of the target changes what is displayed in the build target display area in the project window. For more information on items in the project, see the IDE User Guide. The Edit > Target Settings menu item also changes to reflect the new build target name.
Figure 3.6 Target Name set to "AboutBox"
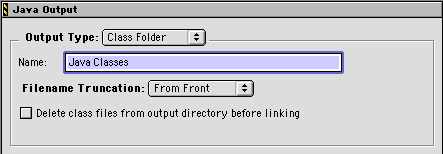
3. Change the Output Type to Class Folder
Select Java Output under the Linker section in the list of settings panels. Change the Output Type to Class Folder as in Figure 3.7.
Figure 3.7 Output Type set to Class Folder
 NOTE:
NOTE:
The Filename Truncation option in Figure 3.7 only applies to the Macintosh version of the CodeWarrior IDE, and will only appear in that version of the IDE.
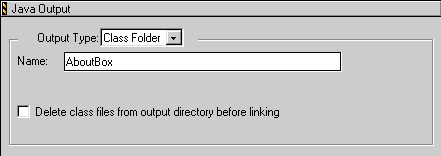
4. Change the Name of the Class Folder
Change the Name field to AboutBox as in Figure 3.8. These settings instruct CodeWarrior to create a new class folder named AboutBox in the same folder as your project. For this tutorial, we do not need to modify any other settings in this panel.
Figure 3.8 Java Output panel
5. Save the settings
Click the Save button at the bottom of the Target Settings dialog box.
6. Close the Target Settings dialog box.
Click the close box on the Target Settings window now to close it.
 NOTE:
NOTE:
Depending on which options were changed, you may see the dialog in Figure 3.9 upon closing the Target Settings dialog. Click the Cancel button to cancel the closing of the dialog allowing you to make more changes before continuing. Click the OK button to close the dialog.
Figure 3.9 Relink Target caution dialog

Now that all the settings for the project have been changed, CodeWarrior will build the type of applet we want. You are now ready to proceed to the next section, where you will start writing the code for the applet.
Writing the Applet

In this section, you write the actual code for the applet. Topics discussed in this section of the tutorial are:
Adding the Java File

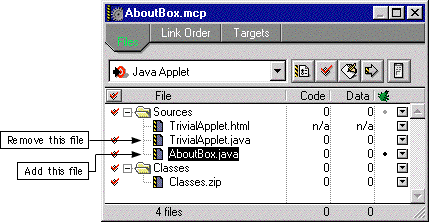
The code for the AboutBox applet is fairly extensive at almost 75 lines. To make things easier, the code is provided for you in the tutorial folder. All you need to do is add it to the project, and remove the place-holder file that is there now.
1. Tell the IDE where to add the file
We want the AboutBox.java file to be added to the appropriate group in the project window (in this case, the Sources group). To do this, highlight any file in the Sources group, or highlight the group title itself.
2. Add AboutBox.java to the project
Choose Project > Add Files. An add files file dialog will appear. Navigate to the AboutBox Tutorial folder and add the AboutBox.java file to the project.
3. Remove the TrivialApplet.java file
Select the TrivialApplet.java file and choose Project > Remove Selected Items. The resulting project window should look similar to the one in Figure 3.10.
 NOTE:
NOTE:
The TrivialApplet.java file is still in the AboutBox Tutorial folder. You can delete it if you want. But leaving it there will not affect your project.
Figure 3.10 Adding Java file to the project
Java Naming Conventions
The name of the Java file is important. The name of the file should be the same as the name of the class created in the file, and end with the .java extension. This extension is a Java programming convention for naming source files. The Metrowerks Java compiler uses this extension to recognize Java source files more easily.
 NOTE:
NOTE:
Actually, the Metrowerks Java compiler allows Java filenames to be different from the classes contain in them. This feature is useful on the Mac OS, which limits file names to 32 characters, which is too short for some Java class names. However, you should name a Java file after its class whenever possible, so your code is compatible with all Java compilers. If you must give a file a different name, choose a name that is as close as possible to the name of the class defined in that file.
Now when you compile the project, CodeWarrior will use the new code you have supplied in the AboutBox.java file. We are now ready to advance to the next section.
Examining the code
Open the AboutBox.java file and look at the source code.
 NOTE:
NOTE:
Do not make any changes to the source code yet.
Reading the comments in the code will help you understand the functionality of the applet. If you are not familiar with Java syntax, you may not understand all the code. That is OK. The purpose of this tutorial is not to teach you Java, but to introduce you to CodeWarrior. For a list of recommended Java documentation, see "Where to Go from Here".
Editing the HTML File

CodeWarrior allows you to add files to a project which do not contain source code. This allows you to keep track of all files related to a project, even those that are not compiled.
While developing an applet, programmers normally use a small HTML file that embeds the applet code, which is used to view it as the applet is being developed. The project stationery for an applet project includes a sample file, TrivialApplet.html for this purpose.
When you choose Project > Run, the CodeWarrior IDE passes the first HTML file in the Link Order view of the project window to the applet viewer. The applet viewer uses the HTML file to pass parameters to the Java applet.
 NOTE:
NOTE:
For more information on either the File view or Link Order view of the CodeWarrior project window, see the IDE User Guide.
In this section, you edit the TrivialApplet.html file so that it contains what we need for our applet to function.
1. Open the TrivialApplet.html file
Double-click the TrivialApplet.html file in the project window. The CodeWarrior IDE opens a new window titled "TriviaApplet.html" and displays the html.
2. Edit the HTML.
Choose Edit > Select All. CodeWarrior selects all of the HTML. Press Delete on the keyboard to remove the HTML. Replace it with the HTML in Listing 3.1.
Listing 3.1 New HTML for the AboutBox applet
<html>
<head><title>Java Tutorial</title></head>
<body bgcolor="#F5DE93">
<center>
<applet codebase="AboutBox" code="AboutBox.class"
width="319" height="99"
image="AboutBox.gif"
sound="metalstamp.au">
</applet>
<p>
<font size="5"><b>metro</b>werks - </font>
<font size="4"><i>Software at Work ™</i></font>
</p>
</center>
</body>
</html>
The applet tag in the HTML code tells the web browser that the applet code can be found in a folder named AboutBox. It also sets the viewing size of the applet, and specifies the image file to use and the sound file to play.
3. Save the new HTML under a different filename.
Choose File > Save As. The editor displays a save file dialog. Rename the file "index.html". Navigate to the AboutBox Tutorial folder and click the Save button to save the file.
The file TrivialApplet.java is still in the AboutBox Tutorial folder. You can delete it if you want. But leaving it there will not affect your project.
4. Remove the TrivialApplet.html file from the project
Select the TrivialApplet.html file in the project window, and choose Project > Remove Selected Items to remove it from the project.
Your project window should now look similar to the one in Figure 3.11.
Figure 3.11 Project window with new HTML file
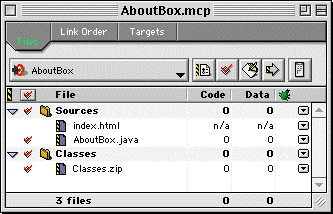
Now that all code and needed files have been included in the project, we are ready to proceed to the next section.
Compile and Run

You are now near the final stages of your first Java applet, and this tutorial. All that is left to do is compile and test the applet to make sure it runs smoothly.
Compile

Choose Project > Make. CodeWarrior compiles and links your code into the finished applet, all in one step.
CodeWarrior is very smart about picking up syntax errors at compile time. Usually these errors are the result of mistyped or unused variable names, incorrect class information, or other related errors. The tutorial code has one deliberate error. CodeWarrior will display it now as shown in Figure 3.12.
Figure 3.12 The Error & Warnings window
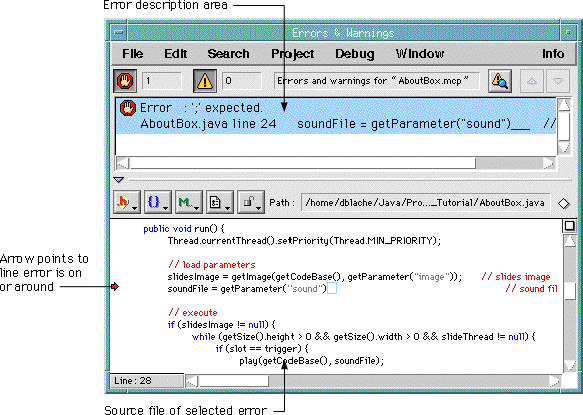
The Errors & Warnings window displays a list of errors the compiler found when it tried to make the project. In this case there is only one error. The bottom part of this window displays the source file that contains the selected error. The red arrow points to the area of code where the error was encountered. Sometimes the error is on the same line, but it can also be found a line or two before depending on the type of error.
Fix the Error

The source view of Errors & Warnings window is completely editable. You can edit and save your code directly from this window. There is no need to open up the source file and try to find the error manually. This is a great time saver if you have many errors.
In this case, the error is a missing semicolon (;) at the end of the line pointed to by the red arrow. We will fix this line and recompile the project.
1. Correct the problem line
Click at the end of the problem line and type a semicolon (;).
2. Save the corrected code
Then choose File > Save to save the file.
3. Compile the project again
We are done with the Errors & Warnings window now. Close it. Then choose Project > Make to compile the project again.
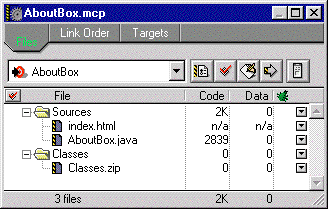
Note that while CodeWarrior is building your project, the check mark to the left of the files in the project window is erased, indicating that the files no longer need to be compiled. In the Code column, the number of bytes of code is updated. The number is zero for the classes.zip file because that is a shared library to which the applet links at runtime. This file contains the Java classes and methods called from the AboutBox.java source file.
When the project is completely compiled and ready to run, the project window should look like Figure 3.13.
Figure 3.13 Compiled java project
Examine the Output

Take a minute to examine the class folder produced by CodeWarrior. It is in the project folder, and is named AboutBox. It contains three files:
AboutBox.class - the class file generated by the Make command
AboutBox.gif - the supplied image which is used by the applet
metalstamp.au - the supplied sound file used by the applet
 NOTE:
NOTE:
The applet parameters in the HTML we are using for this tutorial look for the images in the AboutBox folder, where the class file resides. For your convenience, we have placed the image file and sound file inside of this folder so that after a successful compile, you will be able to use the class folder without any additional work. Normally, however, you will need to ensure that you place any additional files such as images in the appropriate place so that your applet will run correctly.
Run the Applet

The last thing to do at this point is test whether the applet works as expected. Choose Project > Run. CodeWarrior launches the applet viewer chosen in the Java Target settings panel, passing it the HTML file in your project. The applet viewer then reads the HTML file, which tells it where to find the class file, image file, and sound file used in the applet.
There is a bug in the applet, which we will discuss in the next section.
Debugging the Applet

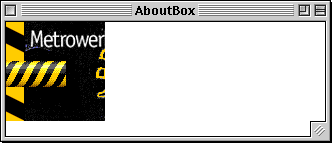
As you have probably already noticed, the applet appears to animate, and the metalstamp.au sound is played. But only part of the applet is being displayed, as shown in Figure 3.14. The bug that is causing this problem is probably in the method that does the drawing. So we will look at that part of the file now to see if we can spot the bad code.
Figure 3.14 Applet bug
Using the CodeWarrior Debugger

The CodeWarrior Debugger is integrated into the CodeWarrior IDE to help you debug your code. The same debugger is used for Java, C, C++, Pascal, and assembly language.
The debugger is called a "source level debugger" because it displays the source code so you can see exactly which line will be executed next. This lets you get a clearer understanding of your code, without the need to learn assembly language.
For more information on the debugger, see the Debugger User Guide.
1. Enable the Debugger
Before you can debug the Java code, you must first tell CodeWarrior to use the debugger when running the applet. Choose Project > Enable Debugger. CodeWarrior prepares the project for debugging.
2. Turn On Debugging for the Java File
In order for CodeWarrior to debug a file, the file must be marked for debugging in the project window. We want to mark the AboutBox.java file for debugging. To do this, click in the debug column next to AboutBox.java.
3. Open the Java source code file
We know roughly where we can find the problem code in the Java source code file. Open the AboutBox.java file by double-clicking it in the project window.
4. Locate the update() method
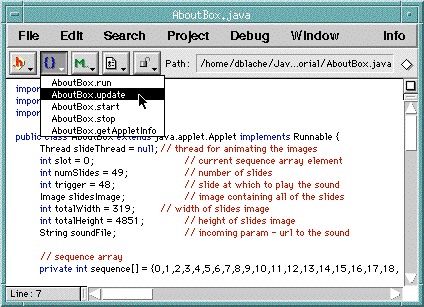
Find the update() method. An easy way to scroll a method into view in the CodeWarrior editor is to select the method name in the function pop-up menu as shown in Figure 3.15.
Figure 3.15 Using the function pop-up menu
5. Set a Breakpoint
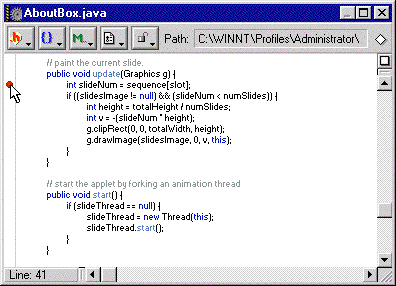
To set a breakpoint, click the breakpoint column on the left-hand side of the window, next to the line of source code you want execution to stop on. A red stop sign will appear in the column where you click.
In this case we want to set the breakpoint on the first line of code in the update() method:
int slideNum = sequence[slot];
Figure 3.16 shows how the editor window should look once the breakpoint has been set.
Figure 3.16 Setting a Breakpoint
6. Start the Debugging Session
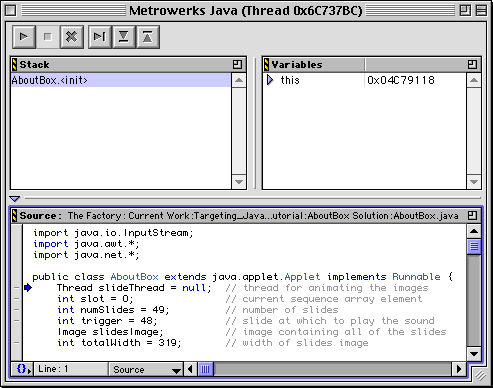
To start the debugging session, choose Project > Debug. CodeWarrior passes the HTML file to the debugger. The debugger launches the applet viewer chosen in the Java Target settings panel. The applet viewer then loads the applet and creates a window for it to run in. Finally, the debugger comes to the front, displaying the program window for the applet, with the current-statement arrow at the first line of code in the main class of applet, as shown in Figure 3.17.
The debugger allows you to examine variables, step through the program, set breakpoints, and perform other debugger functions. The top left pane is the Stack pane. This pane shows the order in which each method has been executed, called a call chain. The pane at the top right of the window is the Variables pane. It lists the variables in use by the current function, along with the current values of those variables. The bottom pane is the Source pane. It displays the source code currently being executed. The arrow in the Source pane is called the current statement arrow. This arrow points to the line of code that will be executed next. See the Debugger User Guide for a more detailed description of the debugger windows.
Figure 3.17 Starting the debug session
7. Jump to the Breakpoint
 To get to the breakpoint we set earlier, we need to tell the debugger to run the applet. Do this by pressing the Run button (shown at the left).
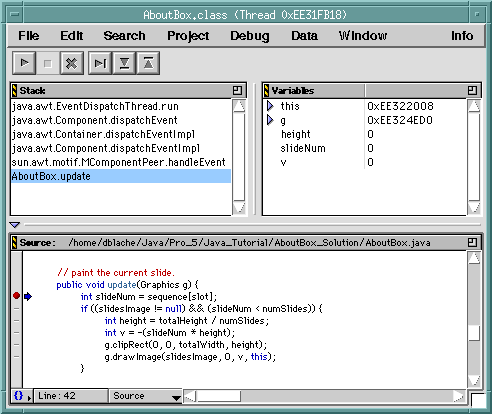
CodeWarrior hides the debugger window, and the applet continues execution until the breakpoint is reached. Then the debugger window is displayed again, this time with the current-statement arrow at the line with the breakpoint, as shown in Figure 3.18.
Figure 3.18 Jumping to the breakpoint
8. Step Through the code
 The debugger lets you step through the source code one line at a time. You do this by clicking the Step button (shown at the left).
Step through the code until you get to the following line:
g.clipRect(0, 0, height, totalWidth);
The Solution

Remember that the applet seems to run correctly except that the right side of the animation is not being displayed. If you open the image you will see that the image is the correct size. But only part of the image is being displayed in the applet. It is as if the right side of the animation is being clipped out of the display.
If we look up the clipRect() method in Sun's JDK 1.1.6 API documentation, we see the following description:
public abstract void clipRect(int x,
int y,
int width,
int height)
There is the problem! The order of the width and height parameters in our code is reversed in our code! We are supplying height where the width should go, and totalWidth where the height should go.
The image being used for this tutorial is 319 pixels wide, and 99 pixels high. Our clipRect() parameters are instructing the applet to clip to only 99 pixels wide.
Now we will stop the debugger and correct the problem line in the Java source code.
1. Stop the debugger
 To stop the debugger, click the Stop button (shown at the left). The applet viewer will terminate the applet, and will return control to the debugger. The debugger will then close it's window and return control to the CodeWarrior IDE.
2. Open the Java source code file
If the AboutBox.java file was open prior to the debugging session, the CodeWarrior IDE displays it once again. If the AboutBox.java file is not open, open it now by double-clicking it in the project window.
3. Edit the source code
Edit this line:
g.clipRect(0, 0, height, totalWidth);
Change it so that it reads:
g.clipRect(0, 0, totalWidth, height);
4. Save the changes
Choose File > Save to save the correction.
5. Run the applet
Choose Project > Run to run the applet again.
The applet will now display properly as in Figure 3.19.
Figure 3.19 Applet running properly
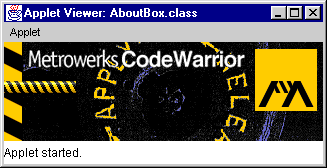
You have just successfully completed your first Java applet using the CodeWarrior IDE!
Exercise

There is still more that can be done with this applet. This section discusses some improvements that can be made to the applet. As we progress in this section, you can check your progress against the files in the AboutBox Excercise folder if you are unsure of anything.
Currently, the number of slides, the sequence in which to play the slides, the slide to play the sound on, and the dimensions of the image file are all "hard coded" into the applet. If we want to change any of these things, we have to recompile the applet.
It would be much better if these things were supplied as parameters in the HTML file, just as the sound file and image file are now. To make it so, we need to change quite a few things in the Java source file.
Number of Slides Parameter
Rather than having a predetermined number of slides, the user will specify how many slides are in the slide show via a "slides" parameter in the applet tag in the HTML file.
The following line of code in the Java file sets the value of the numSlides variable:
int numSlides = 49;
Change this to:
int numSlides = 0;
This makes the default number of slides zero. To get the slides parameter, add the following line to the end of the section that loads the parameters:
numSlides = Integer.parseInt(getParameter("slides"));
Slides Image Size and Orientation Parameter
The current applet has no provisions for a slides image with a different width or height. It also has no provisions for using a different orientation in the slides image - it assumes that the slides will be stacked vertically in the slides image. We want the applet to be more flexible in this respect.
First, we will make provisions for a new parameter called orientation. Add the following line to the top of the file where variables are initialized:
String orientation;
Then add the following line to the section that loads parameters:
orientation = getParameter("orientation");
The totalWidth and totalHeight variables are currently set to 319 and 4851 respectively when the applet loads. This is done at the top of the file with the following lines:
// int totalWidth = 319;
// int totalHeight = 4851;
Change these lines to:
int totalWidth = 0;
int totalHeight = 0;
Just under the section of code that loads parameters, add the following code. This code calculates the values for the totalWidth and totalHeight variables based on the orientation, the size of the applet, and the number of slides in the slide show.
// calc total height & width
if ((orientation.equals("v")) | (orientation.equals("vertical"))) {
totalHeight = getSize().height * numSlides;
} else {
totalHeight = getSize().height;
}
if ((orientation.equals("h")) | (orientation.equals("horizontal"))) {
totalWidth = getSize().width * numSlides;
} else {
totalWidth = getSize().width;
}
Now the applet will calculate the image width and height based on the number and orientation of the slides and the size of the applet.
Sound Slide Trigger Parameter
The sound file is currently played when slide number 47 is displayed. And the only way to change that is to recompile the applet. It would be a lot better to be able to specify this value in the HTML file that calls the applet.
The following line at the top of the applet sets the value of the trigger variable to 47 when the applet loads:
int trigger = 47;
Change this line to:
int trigger = 0;
Add the following line to the section of the code that loads the parameters:
trigger = Integer.parseInt(getParameter("trigger"));
Now the user may specify the sound trigger via a "trigger" parameter in the applet tag in the HTML file.
Slide Sequence Parameter
The last thing we want to do is allow the user to specify the slide sequence via a sequence tag in the HTML file.
The following line at the top of the Java file defines and initializes the sequence array:
//private int sequence[] = {0,1,2,3,4,5,6,7,8,9,10,11,12,13,14,15,16,17,18,19,20,21,22,23,24,25,26,27,28,29,30,31,32,33,34,35,36,37,38,39,40,41,42,43,44,45,46,47,48,49,48,49};
Change this line to:
private int[] sequence;
Add the following code just after the section of code that calculates the total height and width of the image:
// generate the sequence array
StringTokenizer st = new StringTokenizer(getParameter("sequence"),",");
sequence = new int[st.countTokens() + 1];
int x = 1;
while(st.hasMoreTokens()) {
sequence[x] = Integer.parseInt(st.nextToken());
x = x + 1;
}
The code above uses the StringTokenizer class to parse the sequence string and extract the elements of the array. StringTokenizer is part of the java.util package, which is not currently imported in the Java file. Add the following line to the very top of the file:
import java.util.*;
Now the sequence can be specified via a sequence tag in the applet tag in the HTML file.
Using HTML Tags to Supply the New Parameters
To supply the new parameters we just made provisions for, you will add new parameters to the applet tag in the HTML file. Four new parameters are required: "slides", "orientation", "trigger", and "sequence". Open the index.html file. This is the current applet tag:
<applet codebase="AboutBox" code="AboutBox.class" width="319" height="99" image="AboutBox.gif" sound="metalstamp.au">
</applet>
Change it to:
<applet codebase="AboutBox" code="AboutBox.class" width="319" height="99" image="AboutBox.gif" sound="metalstamp.au" slides="49" orientation="vertical" trigger="47" sequence="0,1,2,3,4,5,6,7,8,9,10,11,12,13,14,15,16,17,18,19,20,21,22,23,24,25,26,27,28,29,30,31,32,33,34,35,36,37,38,39,40,41,42,43,44,45,46,47,48,49,48,49">
</applet>
That is it. No more modifications are required.
Choose Project > Run to make the project and run the new applet.
There are still things that can be done to this applet to make it better. For instance, little checking is done to verify that the incoming parameters are valid.


Visit the Metrowerks website at: http://www.metrowerks.com
For assistance contact Metrowerks Technical Support at: support@metrowerks.com
Copyright © 1999, Metrowerks Corp. All rights reserved.
Last updated: May 24, 1999
 NOTE:
NOTE:


 NOTE:
NOTE:

 WARNING!

 NOTE:
NOTE:

 WARNING!

 NOTE:
NOTE:


 NOTE:
NOTE:

 NOTE:
NOTE:

 NOTE:
NOTE:

 NOTE:
NOTE:
 NOTE:
NOTE:
 NOTE:
NOTE:


 NOTE:
NOTE:


